Tutorial: Time zone convertor
Note
This document starts out with a fairly simple application code and proceeds by building on it. Therefore, we recommend that the reader codes along and tries out the various stages of the application. In this manner, completing it should take about an hour.
While Clastic supports building all sorts of web applications and services, our first project will be a traditional, HTML-driven web application. It will convert a given time (and date) between two time zones. The user will enter a date and time, and select two time zones from a list of all available time zones, one for the source location and one for the destination location. A screenshot of the final application is shown below.
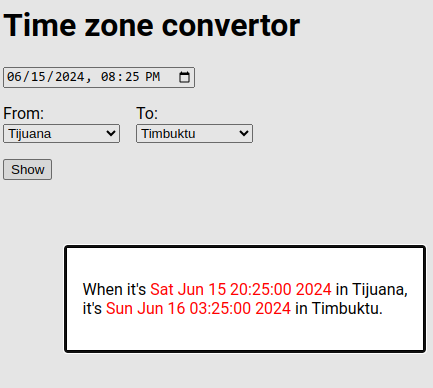
After selecting the time and two time zones, clicking the “Show” button will display the given time in the source location and the corresponding time in the destination location.
Before we start, a note about time zones: these are represented in “region/location” format, as in “Africa/Timbuktu”. While most such codes have two parts, some have only one (like “UTC”), and some have more than two (like “America/North_Dakota/New_Salem”). Also note that spaces in region and location names are replaced with underscores. Refer to the “List of tz database time zones” for a full list.
Prerequisites
It’s common practice to work in a separate virtual environment for each project, so we suggest that you create one for this tutorial. Read the “Virtual Environments and Packages” section of the official Python documentation for more information.
For this application, the only prerequisite is installing Clastic:
pip install clastic
Note
We are going to use the zoneinfo module
which was added to the standard library in Python version 3.9.
If it’s not available in your environment,
you can adjust the code to use the dateutil package.
Getting started
Our first implementation will just display the form; it won’t handle the submitted data. It consists of a Python source file and an HTML template file, both in the same folder.
First, let’s take a look at the template file (home.html):
 1<!DOCTYPE html>
 2<html lang="en">
 3<head>
 4  <meta charset="utf-8">
 5  <title>Time zone convertor</title>
 6</head>
 7<body>
 8  <h1>Time zone convertor</h1>
 9  <form action="/show" method="POST">
10    <input type="datetime-local" name="dt" value="{default_time}" required>
11
12    <div class="timezones">
13      <div class="timezone">
14        <label for="src">From:</label>
15        <select name="src" id="src">
16          {#zones}
17          {@eq key=location value="{default_src}"}
18          <option value="{zone}" selected>{location}</option>
19          {:else}
20          <option value="{zone}">{location}</option>
21          {/eq}
22          {/zones}
23        </select>
24      </div>
25
26      <div class="timezone">
27        <label for="dst">To:</label>
28        <select name="dst" id="dst">
29          {#zones}
30          {@eq key=location value="{default_dst}"}
31          <option value="{zone}" selected>{location}</option>
32          {:else}
33          <option value="{zone}">{location}</option>
34          {/eq}
35          {/zones}
36        </select>
37      </div>
38    </div>
39
40    <button type="submit">Show</button>
41  </form>
42</body>
43</html>
Note
Clastic supports multiple template engines; in this application we use Ashes. Ashes is a Python implementation of the Dust template engine for JavaScript.
This template expects some data to be passed to it. These are marked using curly brackets:
default_timeon line 10: The default time.default_srcon line 17: The default source time zone.default_dston line 30: The default destination time zone.zoneson lines 16 and 29: A list of all available time zones, where each element is a dictionary in the form:{"location": "LOCATION", "zone": "REGION/LOCATION"}
For each option in the selection box, the value of the
locationkey is displayed to the user, and the value of thezonekey is submitted as the data (lines 18, 20, 31, 33).
Note that the form is submitted to the /show address (action on line 9)
which we will introduce later.
Next, we turn to the Python code (tzconvert.py):
 1from datetime import datetime, timezone
 2from pathlib import Path
 3from zoneinfo import available_timezones
 4
 5from clastic import Application
 6from clastic.render import AshesRenderFactory
 7
 8
 9def get_location(zone):
10    return zone.split("/")[-1].replace("_", " ")
11
12
13def get_all_time_zones():
14    time_zones = []
15    for zone in available_timezones():
16        entry = {
17            "location": get_location(zone),
18            "zone": zone,
19        }
20        time_zones.append(entry)
21    return sorted(time_zones, key=lambda x: x["location"])
22
23
24ALL_TIME_ZONES = get_all_time_zones()
25
26
27def home():
28    render_ctx = {
29        "zones": ALL_TIME_ZONES,
30        "default_src": "UTC",
31        "default_dst": "UTC",
32        "default_time": datetime.now(timezone.utc).strftime("%Y-%m-%dT%H:%M"),
33    }
34    return render_ctx
35
36
37def create_app():
38    routes = [
39        ("/", home, "home.html"),
40    ]
41    templates_path = Path(__file__).parent
42    render_factory = AshesRenderFactory(str(templates_path))
43    return Application(routes, render_factory=render_factory)
44
45
46app = create_app()
47
48if __name__ == "__main__":
49    app.serve()
Let’s go through this code piece by piece, starting at the bottom and working our way up.
In the last few lines, we create the application and start it
by invoking its serve() method:
app = create_app()

if __name__ == "__main__":
    app.serve()
We create the application in the create_app() function,
where we register the routes of the application.
Every Route associates a path
with a function (endpoint) that will process the requests to that path.
In the example, there is only one route where the path is /
and the endpoint function is home:
def create_app():
    routes = [
        ("/", home, "home.html"),
    ]
    templates_path = Path(__file__).parent
    render_factory = AshesRenderFactory(str(templates_path))
    return Application(routes, render_factory=render_factory)
The route sets the template file home.html to render the response.
We create a render factory for rendering templates
for our chosen template engine
(in this case, an AshesRenderFactory)
and tell it where to find the template files.
Here, we tell the render factory to look for templates
in the same folder as this Python source file.
The Application is then created
by providing the routes and the render factory.
The home() function generates the data that the template expects
(called the “render context”).
The default time is the current time in the UTC time zone;
the default for both the source and destination time zones is UTC;
and the zones list is stored in the ALL_TIME_ZONES variable:
def home():
    render_ctx = {
        "default_time": datetime.now(timezone.utc).strftime("%Y-%m-%dT%H:%M"),
        "default_src": "UTC",
        "default_dst": "UTC",
        "zones": ALL_TIME_ZONES,
    }
    return render_ctx
The list of all time zones is constructed once, at application startup:
def get_location(zone):
    return zone.split("/")[-1].replace("_", " ")


def get_all_time_zones():
    time_zones = []
    for zone in available_timezones():
        entry = {
            "location": get_location(zone),
            "zone": zone,
        }
        time_zones.append(entry)
    return sorted(time_zones, key=lambda x: x["location"])


ALL_TIME_ZONES = get_all_time_zones()
With these two files in place, run the command python tzconvert.py,
and you can visit the address http://localhost:5000/ to see the form.
Handling request data
Our application submits the form data to another page
(the /show path), but that page doesn’t exist yet.
Again, we start with the template (show_time.html):
 1<!DOCTYPE html>
 2<html lang="en">
 3<head>
 4  <meta charset="utf-8">
 5  <title>Time zone convertor</title>
 6</head>
 7<body>
 8  <h1>Time zone convertor</h1>
 9  <p>
10    When it's <time datetime="{src_dt.value}">{src_dt.text}</time>
11    in {src_location},<br>
12    it's <time datetime="{dst_dt.value}">{dst_dt.text}</time>
13    in {dst_location}.
14  </p>
15  <p>Go to the <a href="/">home page</a>.</p>
16</body>
17</html>
The render context for this template has to contain variables
for the source and destination locations
(src_location and dst_location),
and variables for the source and destination date and times
(src_dt and dst_dt).
The date and time variables should be dictionaries
with the keys text and value,
where text is the textual representation to display to the user,
and value is the technical representation suitable for processing.
In the Python code, we need an endpoint function to handle these requests. First, let’s add the corresponding route:
def create_app():
    routes = [
        ("/", home, "home.html"),
        ("/show", show_time, "show_time.html"),
    ]
    templates_path = Path(__file__).parent
    render_factory = AshesRenderFactory(str(templates_path))
    return Application(routes, render_factory=render_factory)
Next, we implement the endpoint function show_time().
Since this function has to access the submitted data,
it takes the request as parameter,
and the data in the request is available through request.values.
After calculating the converted time,
the function passes the source and destination times to the template,
along with the location names.
from zoneinfo import ZoneInfo


def show_time(request):
    dt = request.values.get("dt")
    dt_naive = datetime.strptime(dt, "%Y-%m-%dT%H:%M")

    src = request.values.get("src")
    src_zone = ZoneInfo(src)

    dst = request.values.get("dst")
    dst_zone = ZoneInfo(dst)

    dst_dt = convert_tz(dt_naive, src_zone, dst_zone)
    render_ctx = {
        "src_dt": {
            "text": dt_naive.ctime(),
            "value": dt
        },
        "dst_dt": {
            "text": dst_dt.ctime(),
            "value": dst_dt.strftime('%Y-%m-%dT%H:%M')
        },
        "src_location": get_location(src),
        "dst_location": get_location(dst),
    }
    return render_ctx
The only missing piece is the convert_tz() function
that will actually do the conversion:
def convert_tz(dt_naive, src_zone, dst_zone):
    src_dt = dt_naive.replace(tzinfo=src_zone)
    dst_dt = src_dt.astimezone(dst_zone)
    return dst_dt
Static assets
As our next step, let us apply some style to our page.
Adding styles will require a CSS file, which should be served without processing.
Such files are generally known as static assets.
We create a subfolder named static
in the same folder as our Python source file
and put a file named custom.css into that folder.
Here’s a minimal example content for the file:
body {
  font-family: system-ui, sans-serif;
}

label {
  display: block;
}

div.timezones {
  display: flex;
  gap: 1rem;
  margin-block: 1rem;
}

time {
  color: red;
}
The changes to the Python code will be quite small.
We just add a route by creating a StaticApplication
with the file system path to the folder containing the static assets,
and we set it as the endpoint that will handle any requests
to paths under /static:
from clastic.static import StaticApplication


def create_app():
    static_path = Path(__file__).parent / "static"
    static_app = StaticApplication(str(static_path))
    routes = [
        ("/", home, "home.html"),
        ("/show", show_time, "show_time.html"),
        ("/static", static_app),
    ]
    templates_path = Path(__file__).parent
    render_factory = AshesRenderFactory(str(templates_path))
    return Application(routes, render_factory=render_factory)
Don’t forget to add the stylesheet link to both template files:
<head>
  <meta charset="utf-8">
  <title>Time zone convertor</title>
  <link rel="stylesheet" href="/static/custom.css">
</head>
Working with JSON
Our last task is to display the converted time on the same page as the form instead of moving to a second page. In order to achieve this, we’re going to implement a basic JSON API endpoint to update the page with data sent to and received from the application.
Actually, we can use our existing show_time() function for this purpose.
Instead of applying an HTML template to the render context dictionary
returned by this function,
we can pass it to the render_json() function
to generate a JSON response.
from clastic import render_json


def create_app():
    static_path = Path(__file__).parent / "static"
    static_app = StaticApplication(str(static_path))
    routes = [
        ("/", home, "home.html"),
        ("/show", show_time, render_json),
        ("/static", static_app),
    ]
    templates_path = Path(__file__).parent
    render_factory = AshesRenderFactory(str(templates_path))
    return Application(routes, render_factory=render_factory)
At this point, you should be able to test this route using curl:
$ curl -X POST -d dt='2024-06-15T21:39' -d src='America/Tijuana' -d dst='Africa/Timbuktu' http://localhost:5000/show
{
  "dst_dt": {
    "text": "Sun Jun 16 04:39:00 2024",
    "value": "2024-06-16T04:39"
  },
  "dst_location": "Timbuktu",
  "src_dt": {
    "text": "Sat Jun 15 21:39:00 2024",
    "value": "2024-06-15T21:39"
  },
  "src_location": "Tijuana"
}
Now we arrange the home page template. First, we add a modal dialog to display the result. By default, it contains placeholder values:
...
</form>

<dialog id="result">
  <p>
    When it's <time id="src_dt" datetime="2024-01-01T18:00">Jan 1 2024</time>
    in <span id="src_location">UTC</span>,<br>
    it's <time id="dst_dt" datetime="2024-01-01T18:00">Jan 1 2024</time>
    in <span id="dst_location">UTC</span>.
  </p>
</dialog>
We add a static file named static/show_time.js that contains
our JavaScript code:
 1async function showResult(event, form) {
 2    event.preventDefault();
 3    const response = await fetch(form.action, {
 4        method: "POST",
 5        body: new FormData(form),
 6    });
 7    const json = await response.json();
 8    document.getElementById("src_dt").innerHTML = json["src_dt"]["text"];
 9    document.getElementById("src_dt").setAttribute("datetime", json["src_dt"]["value"]);
10    document.getElementById("src_location").innerHTML = json["src_location"];
11    document.getElementById("dst_dt").innerHTML = json["dst_dt"]["text"];
12    document.getElementById("dst_dt").setAttribute("datetime", json["dst_dt"]["value"]);
13    document.getElementById("dst_location").innerHTML = json["dst_location"];
14    document.getElementById("result").showModal();
15}
This function gets the converted time from the JSON endpoint (lines 3-7), updates the data in the modal (lines 8-13), and brings up the modal (line 14).
Finally, we have to add the script to the home page
and call the showResult function when the submit button is pressed:
<head>
  <meta charset="utf-8">
  <title>Time zone convertor</title>
  <link rel="stylesheet" href="/static/custom.css">
  <script src="/static/show_time.js"></script>
</head>
<body>
  <h1>Time zone convertor</h1>
  <form action="/show" method="POST" onsubmit="showResult(event, this)">
Conclusion
This concludes the introductory tutorial. The full application code can be found in the repo. Check out the second part to learn more about Clastic’s features.